
What Is RV Delamination and What Causes It?
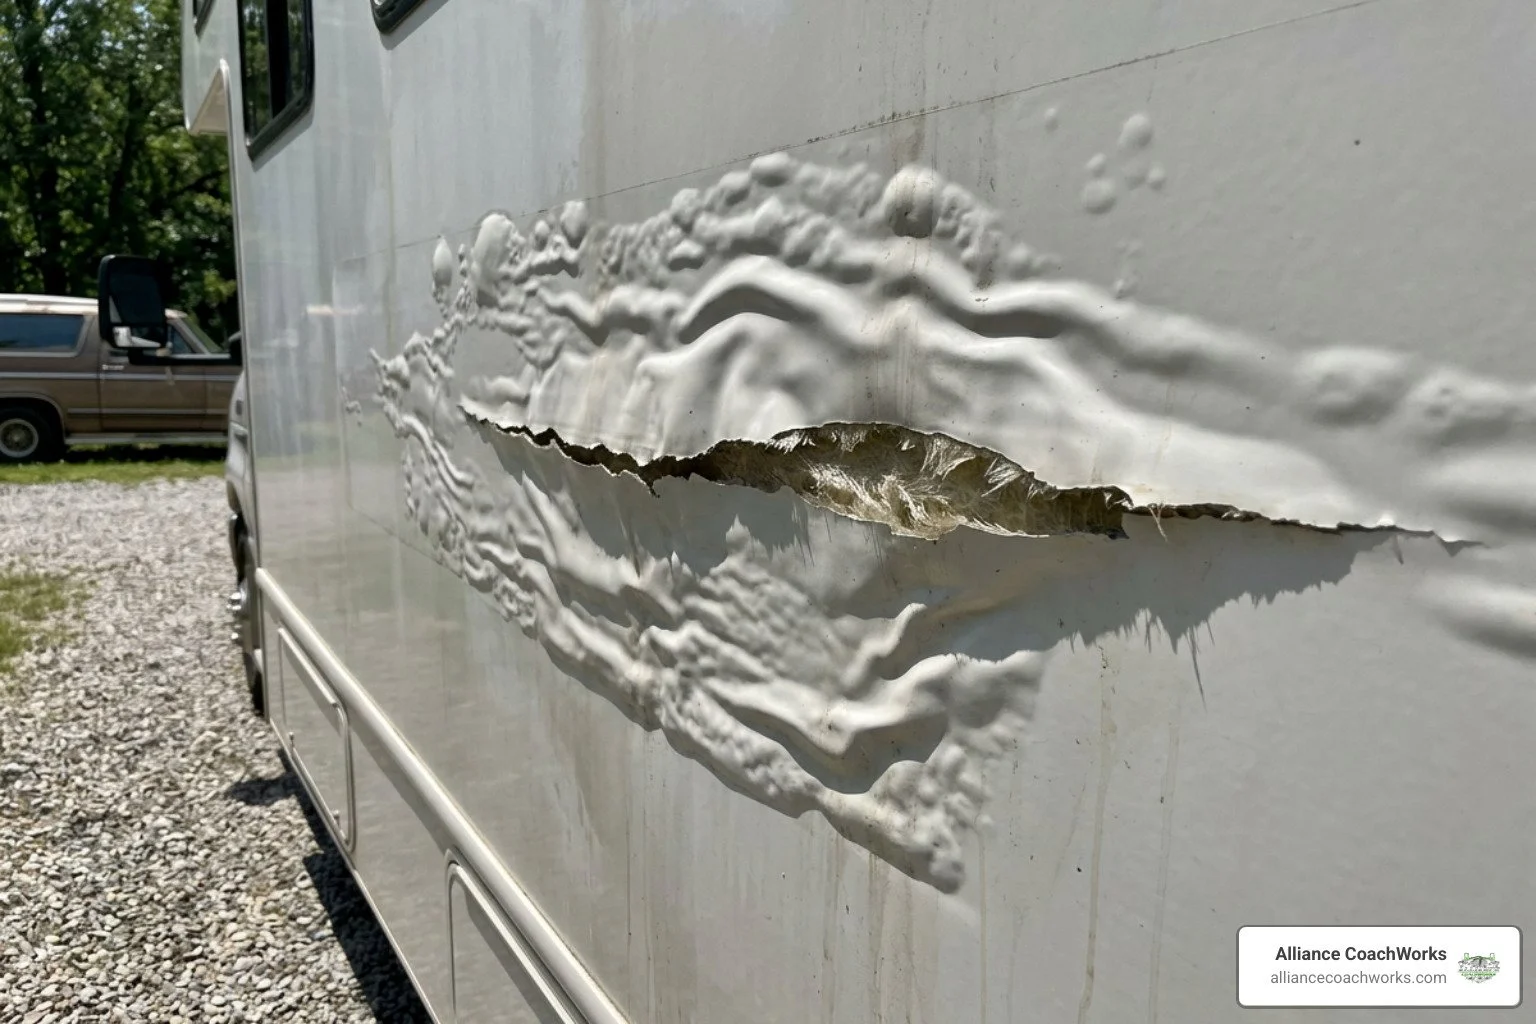
At its core, RV delamination is the failure of the adhesive bond holding your rig's layered sidewall together. When that bond fails, the thin exterior fiberglass skin separates from the interior backing board, insulation, and frame, causing the exterior surface to warp, buckle, ripple, or form prominent blisters.
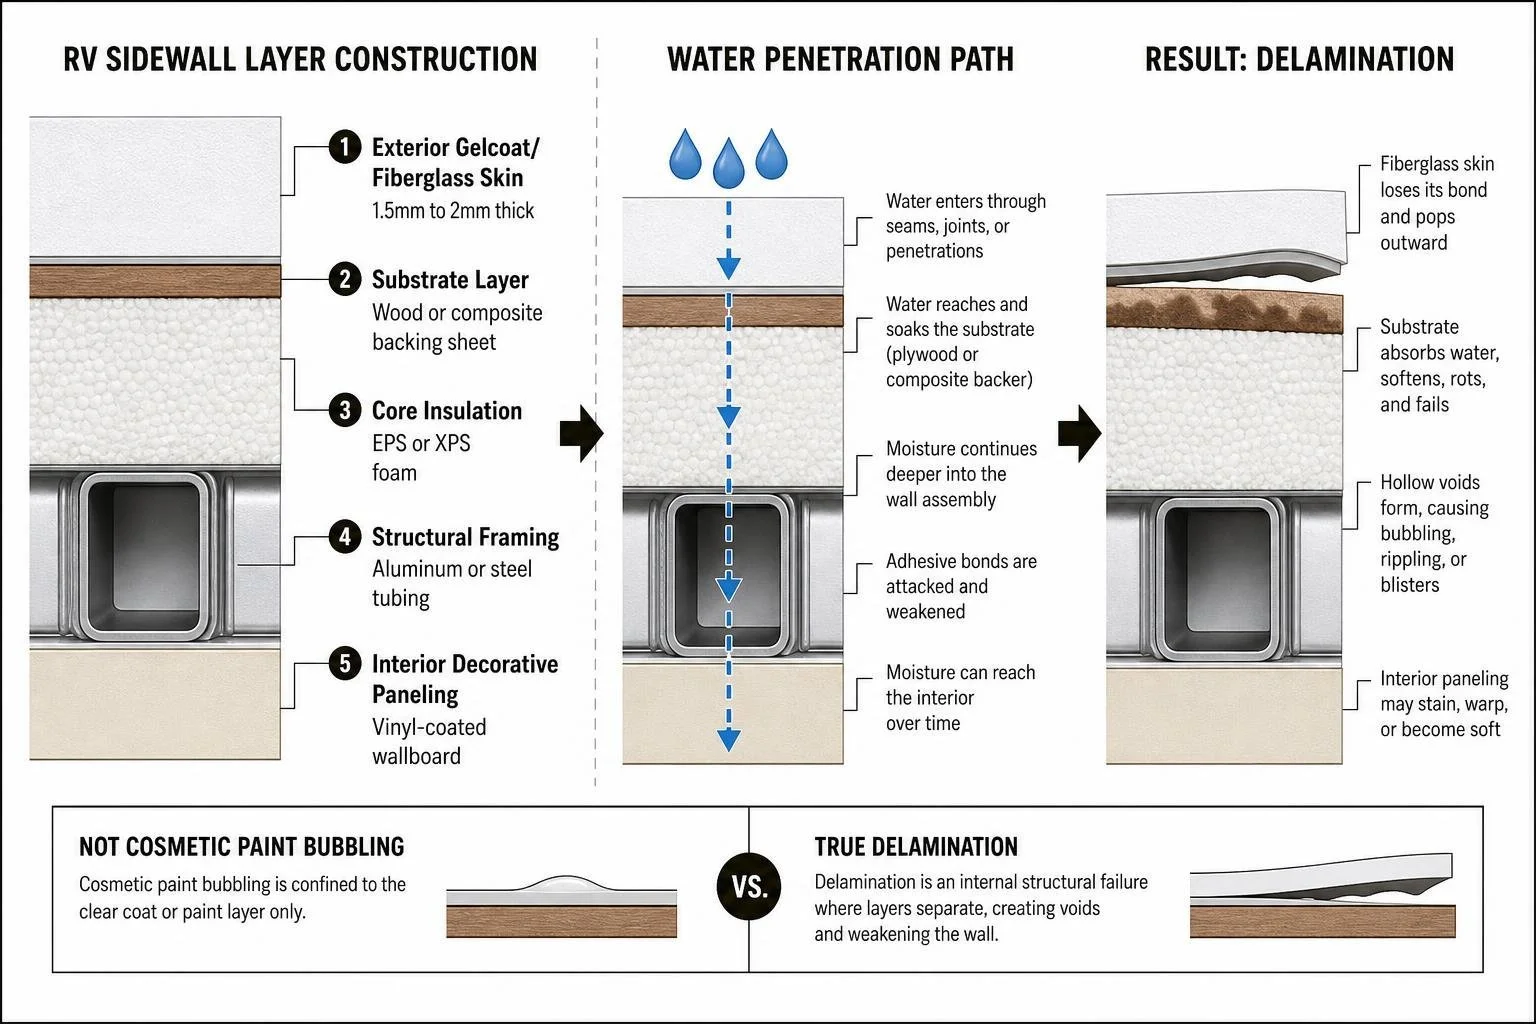
To understand why delamination happens, you have to look at how modern composite RV walls are engineered. Most modern motorhomes, fifth wheels, and travel trailers use a multi-layer sandwich construction. The wall assembly consists of several distinct layers bonded under high pressure:
1. Exterior Gelcoat/Fiberglass Skin: The hard, glossy outermost protective layer (typically 1.5mm to 2mm thick).
2. Substrate Layer: A thin wood or composite backing sheet, traditionally lauan plywood (a tropical hardwood veneer) or modern composite backers like Azdel.
3. Core Insulation: Rigid expanded polystyrene (EPS) or extruded polystyrene (XPS) closed-cell foam.
4. Structural Framing: Welded aluminum or steel structural tubing, positioned within the foam core.
5. Interior Decorative Paneling: The vinyl-coated wallboard visible inside your living space.
During factory manufacturing, industrial urethane or epoxy adhesives are applied between every layer. The entire sandwich is run through a pinch-roller or placed in a large vacuum press to create a rigid, unified composite panel.
When moisture gets between these layers, it attacks the adhesive bond. Lauan plywood absorbs that water, softens, rots, and shears apart internally. The outer fiberglass skin loses its anchor point and pops outward, creating hollow voids.
This is fundamentally different from cosmetic paint bubbling. A cosmetic blister is confined to the clear coat or paint layer, whereas true delamination represents an internal structural failure of the wall assembly itself.
It is also why diagnosing a laminated fiberglass trailer requires a completely different approach than working on an aluminum-sided unit. As we detail in our comparison of Fiberglass vs Aluminum RV Repair Fort Worth, aluminum RVs use "hung-wall" construction where metal panels are stapled over wood framing without full-surface adhesive lamination. Aluminum siding does not delaminate, whereas composite fiberglass walls depend entirely on adhesive integrity.
Primary Causes of RV Wall Delamination
While delamination manifests on the outside of your rig, its origin is almost always hidden within the wall cavity. Here are the primary catalysts that trigger adhesive failure:
● Moisture Intrusion (Over 90% of All Cases): Water is the single biggest enemy of laminated RV construction. A microscopic hairline split in a sealant joint allows rainwater to wick between the fiberglass and the lauan substrate. As the wood absorbs moisture, it swells and rots, destroying the chemical and mechanical bond of the glue.
● Roof Seam and Transition Failures: Water naturally obeys gravity. When perimeter roof seals or front/rear transition caps dry out, crack, or pull away, moisture channels downward behind the exterior fiberglass skin. You can review the critical indicators of roof degradation in our guide on Signs Your RV Roof May Be Failing.
● Window, Door, and Slide-Out Perimeter Leaks: Every opening cut into an RV sidewall creates four seams vulnerable to water ingress. Slide-out perimeter seals, cargo hatch frames, and clearance light mountings are frequent entry points. Left unresolved, these leaks often lead to compounding structural issues like RV Slide Out Damage Fort Worth.
● Factory Manufacturing Defects: In some instances, delamination occurs on dry, well-maintained rigs due to factory assembly errors. If adhesive was applied unevenly, if the roller press didn't exert uniform PSI, or if the glue cured improperly at the factory, the layers can separate on their own under normal highway vibration.
● Stress Fractures and Impact Damage: A minor strike from a tree branch, road debris, or localized structural flexing near slide-out corners can introduce micro-cracks in the gelcoat. These cracks allow ambient humidity and driving rain to penetrate directly into the core.
● Thermal Cycling and Solar Expansion: Fiberglass expands and contracts rapidly when exposed to intense summer heat and sudden cold snaps. Because fiberglass and wood expand at different rates, severe temperature swings place extreme shear stress on the adhesive layer, accelerating bond failure once moisture is present.
For a deeper dive into the mechanical shear forces involved in composite wall failure, explore this engineering breakdown of fiberglass delamination.
What Are the Early Warning Signs of RV Delamination?
RV delamination is progressive. It rarely starts as a massive, wall-spanning bulge; it begins as a small patch of softened wood behind a window frame or along a roofline. Detecting these early warning signs can save you thousands of dollars in extensive structural reconstruction.
When inspecting an RV—whether you're performing routine maintenance or evaluating a pre-owned purchase—focus closely on these high-risk zones:
● Beneath and around all window frames
● Directly under the roof-to-sidewall transition moldings
● Around slide-out corners, seals, and wiper gaskets
● Surrounding exterior cargo doors and utility access ports (water heater, furnace, fridge vents)
● Directly below exterior clearance lights and awning mounting brackets
● Along bottom skirt rails where road spray kicks up
Visual, Tactile, and Sound Inspection Methods
Detecting delamination requires a combination of visual checks, physical touch, and acoustic testing.
Visual Indicators
Park your RV in direct sunlight and sight down the length of the exterior sidewall from the front corner to the rear, looking along the plane of the wall like a carpenter sighting a board. Delaminated sections reveal themselves as:
● Bubbles and Blisters: Localized areas where the fiberglass pushes outward away from the framing.
● Waviness and Creasing: A distorted, rippling effect across large sections that disrupts the smooth reflection of light.
● Dark Discoloration or Black Spots: Dark staining beneath the clear gelcoat, typically signaling active black mold growing on the wet wood substrate underneath.
● Distorted Decals and Graphics: Vinyl graphics that appear stretched, puckered, or cracked across a specific body panel.
The Tactile Press Test
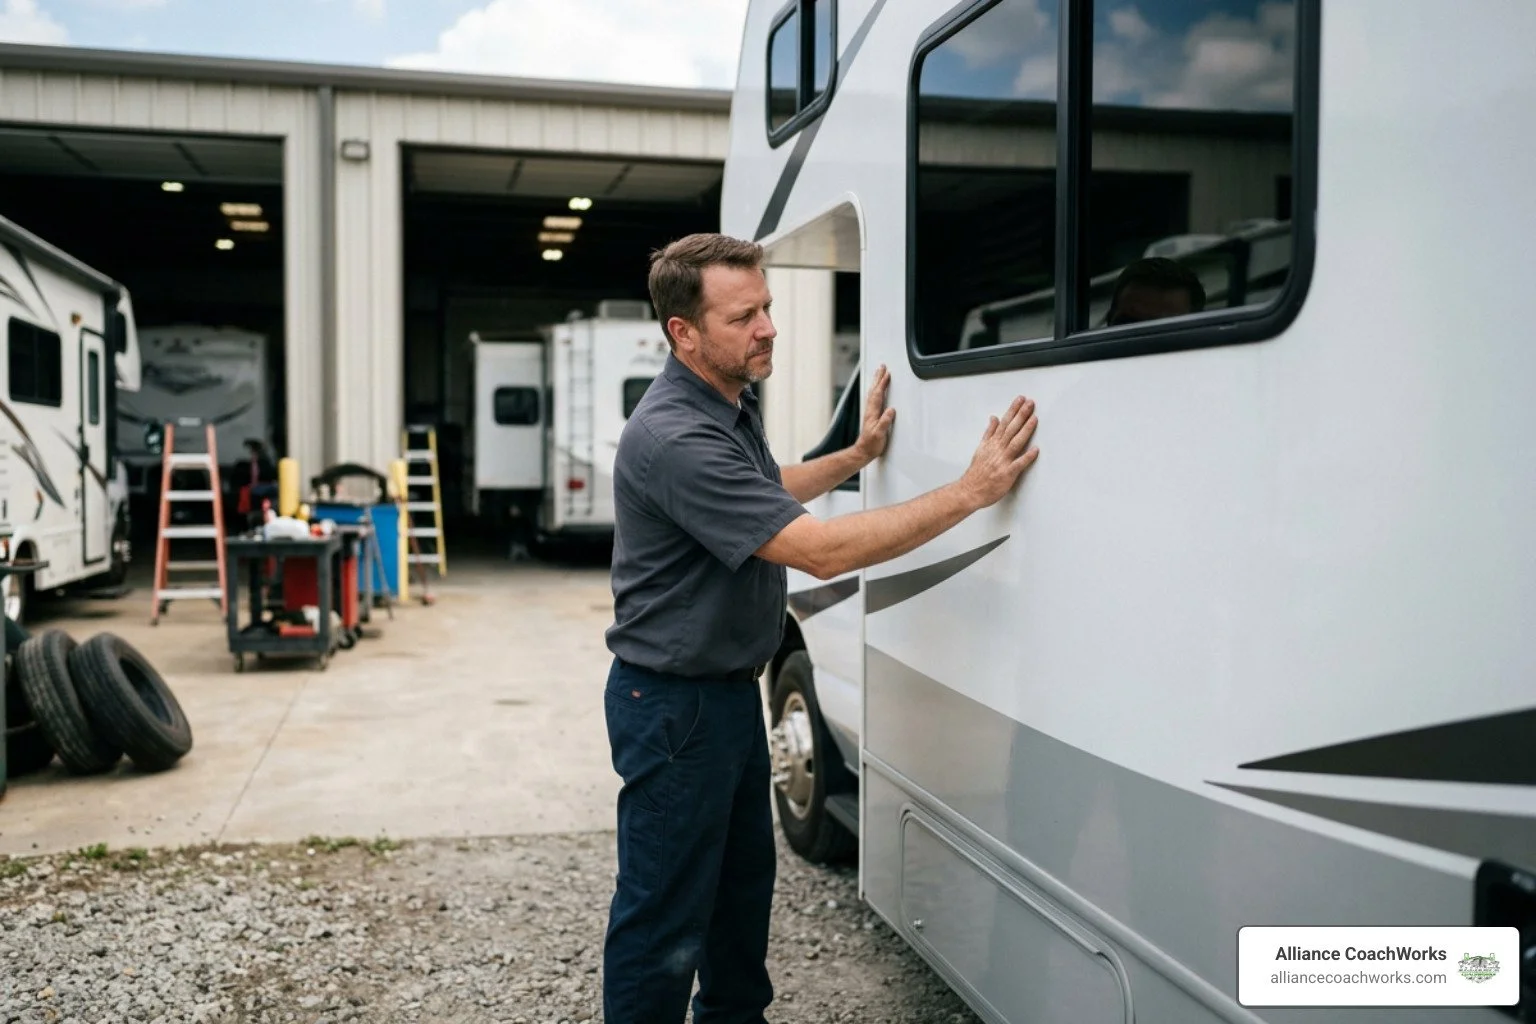
Walk the perimeter of the rig and press your palm and thumb firmly against the fiberglass every 12 to 18 inches, especially around cutouts and moldings:
● Solid Wall: The panel should feel firm, rock-hard, and immovable against the internal studs and foam core.
● Delaminated Wall: The panel will flex inward easily under light thumb pressure, feeling spongy, soft, or springy, and popping back out when released.
The Sound Audit (Tap Test)
Use the back of your knuckles or the plastic handle of a small screwdriver to gently tap the sidewall:
● Bonded Area: Produces a sharp, solid, dense "thud."
● Delaminated Area: Produces a dull, hollow, plastic-like "click" or rattle, indicating air space behind the skin where the fiberglass has separated from the wood backing.
Interior Clues
Because water travels through the entire wall assembly, interior symptoms often appear alongside exterior separation:
● Wrinkling, peeling, or bubbling interior vinyl wallpaper
● Swollen, soft, or discolored interior wood window framing
● Spongy subflooring directly adjacent to exterior walls
● Persistent musty, damp, or mildew odors inside cabinets and perimeter walls
Diagnostic Tools and Moisture Detection
While visual and tactile checks help you spot active separation, professional diagnostic tools let you pinpoint hidden moisture before visible wall bubbling begins.
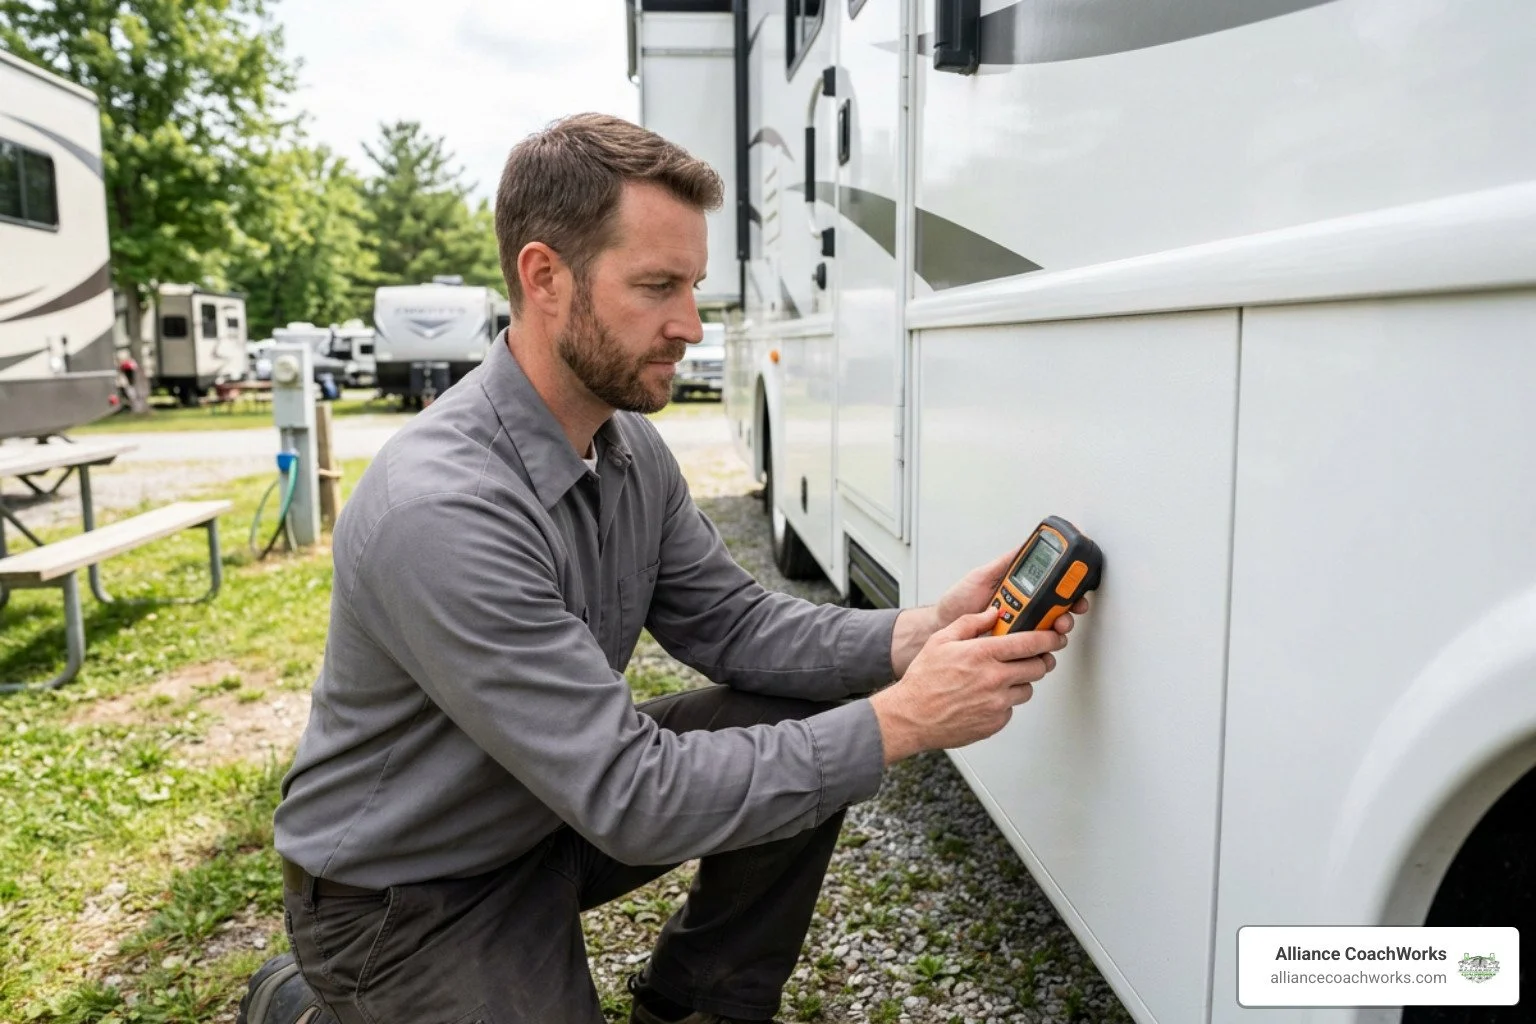
● Pinless Moisture Meters: A non-destructive, pinless moisture meter (such as a capacitive RF meter) allows you to scan fiberglass sidewalls and interior paneling without drilling or puncturing holes. Baseline readings on a dry RV wall typically range between 5% and 12%. Any moisture reading exceeding 15% to 20% indicates active water saturationbehind the fiberglass, confirming a hidden leak that requires immediate intervention.
● Infrared Thermal Imaging: Thermal imaging cameras detect subtle temperature differences caused by evaporative cooling where wet insulation and rotting wood retain moisture. Thermal scans allow technicians to map the exact pathways of water migration down the wall framing.
● Perimeter Tracking: If you discover a localized bubble, mark its outer perimeter with blue painter's tape. Take high-resolution reference photos and date them. This gives you a clear baseline to determine whether the separation is actively expanding after rainstorms or highway travel.
Can You Fix RV Delamination Yourself or Is Professional Repair Required?
Deciding whether to tackle RV delamination yourself or bring your rig to a dedicated repair facility comes down to two factors: the size of the separated area and the condition of the wood substrate underneath.
DIY repair kits can be viable for minor, highly localized separations (areas smaller than 2 to 3 square feet) where the leak was caught immediately, the internal cavity has been dried out completely, and the underlying lauan wood has retained its structural density.
However, DIY repairs are not viable if the internal wood substrate has decayed into mush.Injecting epoxy into rotting, pulverized wood does not create a lasting bond—the glue simply sticks to loose wood fibers, and the wall pops free again the next time the chassis flexes on the highway.
Furthermore, simply sealing over a delaminated wall without verifying that the interior framing is dry will trap residual moisture inside the wall. This accelerates mold growth, rots structural wall studs, and compromises cabinet mounting anchors. When widespread damage threatens the integrity of your rig, bringing it into a shop for dedicated RV Fiberglass Repair in Fort Worth is the safest and most permanent path forward.
The DIY Epoxy Injection Process (For Minor, Localized Spots)
If you have confirmed that your delamination is localized, the underlying framing is structurally sound, and the leak has been resolved, you can perform a DIY injection repair using marine-grade structural epoxy.
Here is how the hands-on process works:
6. Eliminate the Moisture Source: Before touching the delamination, trace and permanently seal the exterior leak. Run commercial dehumidifiers and fans inside the RV for several days until pinless moisture readings drop below 10%.
7. Establish Access Points: Rather than drilling visible holes directly through the exterior gelcoat, remove adjacent window trim, corner moldings, or clearance lights to access the gap behind the skin. If surface drilling is unavoidable, drill small 1/8-inch injection holes in discrete areas (such as along decal lines or the lower edge of the bubble).
8. Mix Low-Viscosity Epoxy: Use a specialized, slow-curing, low-viscosity marine epoxy resin. Thin epoxy flows smoothly across the separated layers rather than pooling into a heavy lump. Mix small batches (4 to 6 ounces) to prevent premature thermal curing.
9. Inject the Adhesive: Load the epoxy into heavy-duty plastic syringes equipped with flexible vinyl tubing. Insert the tubing into the highest injection port and depress the plunger, allowing gravity to pull the resin downward across the void until adhesive begins weeping from lower relief holes.
10. Construct a Rigid Bracing System: Immediate, uniform clamping pressure is essential while the epoxy cures. Place wide sheets of 3/4-inch plywood cushioned with plastic sheeting against the exterior sidewall. Brace heavy 2x4 vertical studs against the plywood, applying distributed pressure using mechanical jacks, heavy weighted drums, or bracing against a solid building wall.
11. Allow a Full 24-Hour Cure: Maintain continuous clamping pressure for at least 24 hours in a temperature-controlled environment (ideally 70°F to 80°F). Once cured, remove the bracing, seal all injection holes with color-matched gelcoat filler, and reinstall all exterior moldings with fresh butyl tape and sealant.
For practical real-world walk-throughs and builder tips on syringe injection, review these DIY delamination repair guides.
Professional Shop Repair and Complete Wall Reconstruction
When delamination covers large wall sections, affects structural slide-out framing, or involves extensive wood rot, surface injection is no longer an option. Professional restoration requires structural rebuild techniques performed in specialized, climate-controlled repair bays.
A comprehensive professional reconstruction involves:
● Deconstruction and Skin Peeling: Technicians remove exterior moldings, windows, and perimeter trims, carefully peeling back the damaged fiberglass skin to fully expose the internal wall cavity.
● Substrate Extraction and Framing Rebuild: All rotted lauan wood, mold-infested insulation, and corroded aluminum studs are cleanly excised. New structural framework and waterproof composite backer boards (such as Azdel) are spliced into the framing with structural mechanical fasteners.
● Industrial Vacuum Lamination: High-strength, two-part polyurethane structural adhesives are applied across the entire wall assembly. The sidewall is placed under an industrial vacuum-bagging press or heavy pneumatic clamping wall, exerting thousands of pounds of even, continuous pressure across the entire panel until fully cured.
● Body Alignment, Gelcoat Blending, and Refinishing: The exterior skin is re-faired, color-matched, and refinished with automotive-grade urethane basecoat and clearcoat, blending the repair seamlessly into your coach's full-body paint scheme.
At Alliance CoachWorks, our specialized structural RV repair facility handles heavy composite wall rebuilds, frame alignments, and full-depth sidewall replacements inside dedicated repair bays built specifically for large motorhomes and towables. Understanding how severe wall rot fits into the broader picture of The Most Common RV Repairs in North Texas helps owners budget effectively and choose long-lasting structural solutions.
How Much Does RV Delamination Repair Cost and Does Insurance Cover It?
The total cost to repair RV delamination depends heavily on the square footage affected, how long water has been leaking into the wall, and whether interior cabinetry, flooring, or full-body paint must be restored.
When an RV suffers extensive sidewall delamination across multiple slide-outs or entire sidewalls, repair costs can quickly reach 40% to 60% of the rig's total market value. To understand how industry appraisers evaluate these severe restoration costs, review these industry cost estimates for sidewall rebuilds.
Realistic Cost Breakdown by Severity
● Minor Localized Repairs ($1,000 to $3,000): Covers small, contained separations (under 3 square feet) around a single window, clearance light, or cargo door. The repair involves leak remediation, localized epoxy pressure-bonding, minor gelcoat touch-up, and complete perimeter resealing.
● Moderate Reconstruction ($3,000 to $8,000): Covers medium-sized delamination zones (4 to 10 square feet) where the exterior fiberglass must be partially released to replace rotted lauan substrate and damaged core foam. This tier includes structural re-bonding, composite splicing, and localized full-body paint blending.
● Severe Multi-Layer Rebuilds ($10,000 to $20,000+): When an entire sidewall has separated or structural wall studs and subfloors have rotted from front cap to rear bumper, the job requires full wall removal and complete reconstruction. This involves full skin replacement, custom vacuum lamination, window re-framing, interior cabinet re-anchoring, and complete multi-stage custom paint refinishing.
For a comprehensive breakdown of regional hourly labor rates, material expenses, and shop considerations across North Texas, see our guide on How Much Does RV Repair Cost in Fort Worth.
Insurance Coverage Realities for Water and Delamination Damage
One of the most common questions RV owners ask is whether standard comprehensive RV insurance covers delamination repair.
In the vast majority of cases, standard RV insurance policies will deny claims for delamination caused by slow, continuous water leaks. Insurance policies are designed to cover sudden, accidental, and direct physical losses. Insurance adjusters classify long-term water seepage around failing window seals, deteriorated roof caulk, or aged moldings as "wear and tear," "gradual deterioration," or "lack of owner maintenance."
When Insurance DOES Cover Delamination: Insurance will generally cover sidewall reconstruction if the moisture intrusion was triggered by a specific, documented covered peril, such as:
● An overhead tree branch piercing the roof membrane during a storm
● A collision with road debris that cracked the fiberglass sidewall
● Impact damage from a tire blowout that tore open the wheel well liner and sidewall framing
If your delamination originated from a sudden physical event, document the initial impact site immediately with date-stamped photos before performing temporary weatherproofing. For an in-depth look at managing claims and working with insurance adjusters, read our detailed analysis on Does Insurance Cover RV Damage in Texas.
How Can You Prevent RV Delamination and Protect Your Investment?
Preventing delamination is straightforward: keep water out of your walls. Because moisture causes over 90% of all delamination cases, a strict seal inspection and maintenance routine is the most effective way to protect your RV's structural integrity and long-term resale value.
Maintaining a detailed logbook of every seal inspection, sealant touch-up, and roof service provides verifiable proof of care. When it comes time to sell or trade in your coach, documented maintenance records give prospective buyers confidence and help you command top dollar on the pre-owned market.
Seasonal Inspection and Resealing Schedule
Every RV is subjected to constant highway vibration, chassis twisting, and temperature fluctuations. Over time, these dynamic forces pull seams apart and break sealant bonds.
Implement this strict maintenance schedule to catch seal failures before water enters your walls:
● Every 90 Days — Complete Exterior Seal Audit: Climb onto the roof and walk the exterior perimeter. Inspect the roof-to-sidewall joint moldings, front and rear end caps, skylights, plumbing vents, and roof air conditioning gaskets. Look for cracking, chalking, shrinking, or peeling lap sealant.
● Check High-Stress Cutouts: Examine the vertical silicone or polyurethane sealant beads surrounding all window frames, entrance doors, slide-out flanges, exterior speakers, and clearance lights. If a sealant bead has pulled away by even a fraction of a millimeter, water will find it.
● Proper Resealing Protocol: Never apply new sealant directly over old, dirty, or peeling caulk. Scrape away the degraded sealant using plastic scraping tools (to avoid gouging the roof membrane or fiberglass), clean the joint thoroughly with isopropyl alcohol or mineral spirits, allow it to dry completely, and apply premium self-leveling lap sealant (for horizontal roof joints) or non-sagging exterior RV polyurethane sealant (for vertical sidewall seams).
● Fix Roof Leaks Immediately: If you discover a cracked roof vent or compromised transition joint, address it immediately before moisture channels downward into your wall panels. You can explore our dedicated repair options for RV Repair Roof Leak to ensure your roof is properly sealed against heavy weather.
● Every 2 to 3 Years — Comprehensive Window & Door Resealing: Remove, re-tape with fresh butyl tape, and reinstall window frames and exterior utility doors that show signs of dried, hardened, or missing factory gaskets.
Storage, Climate Protection, and Moisture Management
External seals protect your rig from rainfall, but proper storage and climate management protect it from internal moisture and solar degradation:
● Control Internal Humidity: Cooking, showering, and running propane heaters generate significant indoor humidity. In cold weather, this warm, moist air migrates into wall cavities, condenses against cold aluminum framing, and causes internal delamination without any exterior leak. Run a dedicated compressor dehumidifier inside the rig during winter camping and storage, and leave roof vents cracked beneath vent covers to promote airflow.
● Protect Against UV Breakdown: Intense Texas sun bakes exterior sealants, turning flexible polyurethane brittle in just a couple of seasons. Store your RV under a covered carport or use a high-quality, multi-layer, breathable RV cover during the off-season.
● Apply Protective Gelcoat Sealants: Wash your RV regularly and apply a high-grade UV-inhibiting carnuba wax or ceramic coating twice a year. This shields the exterior gelcoat from micro-fissuring and prevents oxidation.
● Schedule Annual In-Shop Inspections: Have certified collision and coach technicians perform an annual multi-point inspection, complete with pinless electronic moisture scans and seal checks. You can explore our comprehensive RV repair services or reach out to our team directly through our Contact page to schedule a professional evaluation at our Fort Worth facility.
Frequently Asked Questions About RV Delamination
Can I stop RV delamination from spreading without replacing the entire wall?
Yes, you can halt delamination progression if you act quickly. The first step is immediately finding and permanently sealing the water entry point, then running dehumidifiers until the interior cavity is completely dry. If the underlying wood substrate is still intact, localized epoxy injection can re-bond the fiberglass to the framing, preventing the bubble from growing. However, if water is left inside the wall, natural chassis flex and vibration during travel will cause the separation to spread across the entire panel.
Does aluminum siding on an RV suffer from delamination?
No. Aluminum-sided RVs are built using traditional "hung-wall" construction. In this design, individual interlocking aluminum metal panels are stapled or screwed over a wood or aluminum frame rather than glued into a composite sandwich. Because there is no bonded fiberglass-to-wood adhesive layer, aluminum siding cannot delaminate. However, aluminum rigs can still develop severe hidden internal wood rot, mold, and framing decay if water leaks past exterior seams.
Will delamination make an RV unsafe to drive or tow?
Minor, localized surface bubbling on a flat wall section away from structural mounting points is primarily a cosmetic and moisture issue. However, extensive delamination covering more than 20% to 25% of a wall panel is a significant safety hazard. Severe delamination weakens the overall structural rigidity of the coach, loosens interior cabinet anchors, compromises slide-out alignment, and creates a risk of large fiberglass sheets ripping off the sidewall under high-speed highway wind turbulence.
Conclusion
RV delamination is never just a surface cosmetic defect—it is a clear warning sign of hidden moisture intrusion, adhesive failure, and internal structural decay. Left unaddressed, a minor ripple around a window frame can quickly turn into a five-figure complete sidewall reconstruction.
Protecting your RV comes down to consistent maintenance:
● Inspect all exterior seams, roof transitions, and window seals every 90 days
● Address roof punctures and seal failures the moment they appear
● Use pinless moisture meters to catch hidden water tracks early
● Keep interior humidity under control during cold-weather camping and storage
If you notice bubbling, soft spots, or wall flex on your travel trailer, fifth wheel, or motorhome anywhere across North Texas—including Fort Worth, Keller, Southlake, Haslet, Justin, Trophy Club, and Grapevine—our team at Alliance CoachWorks is here to help. Our dedicated collision and structural repair bays in Fort Worth are fully equipped for precision vacuum lamination, framing rebuilds, and seamless full-body paint restoration.
Reach out to our team today to explore our full range of repair services and protect your investment for every mile ahead.